Navigate to your Funnel and create the page you want customers to see when they click your Unsubscribe link.
Create a new funnel step called Unsubscribe.
Set the path to something such as /unsubscribe.
Once the page is created, click Edit to customize the page however you’d like within the Funnel Builder.
It can be as simple as one column and row with a headline that says “You’ve been successfully unsubscribed.” You can further customize this however you wish with additional text, colors, a logo, etc.
-

Save the funnel page.
Copy the URL of the Unsubscribe page you just created (you’ll need it in future steps). To copy it, click the icon with the arrow pointing to the top right corner, and it’ll be the URL you’ll see in the browser bar.
You can paste it into a new browser tab to preview the page if you wish.
NOTE: If you’ve not yet configured a domain, check out our tutorials on the topic before completing this step.
Navigate to Trigger Links.
Click “Add Link”.
Name the Trigger Link and paste the URL of your Unsubscribe page.
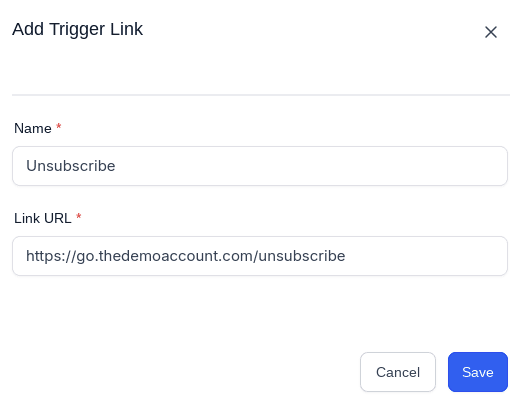
Save to confirm your changes.
Navigate to Workflows > Create Workflow > Start from Scratch.
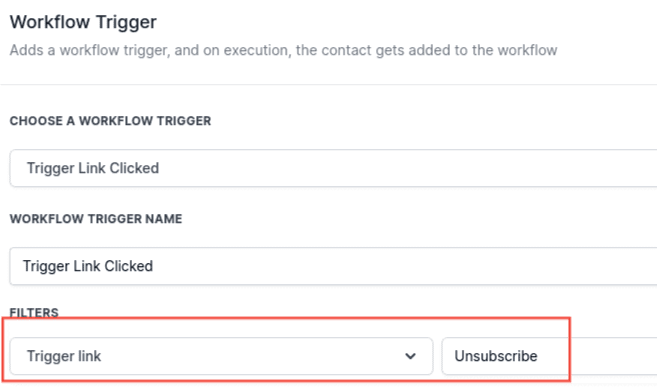
Add a Workflow Trigger: Trigger Link Clicked. You will need to define the filter to the specific trigger link you created as the Unsubscribe link so it fires off the action only for that particular trigger link.
For the first action, click the + and add 'Set contact DND.' Then, you will select 'enable contact DND' from the dropdown menu.
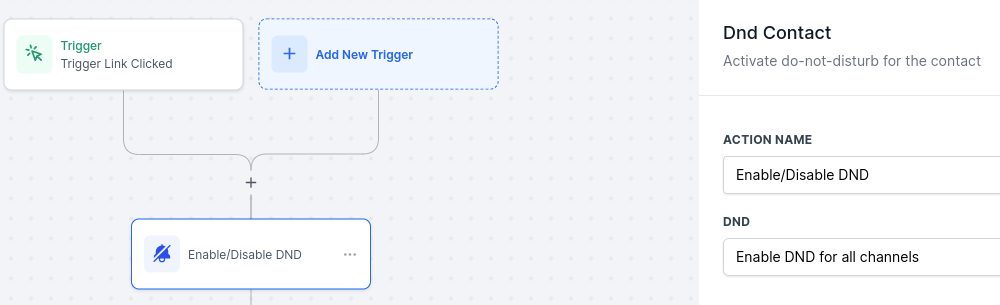
Note: You can also enable DND for specific channels only.
Save the workflow and publish it.
NOTE: You can add additional actions to the workflow if you wish. For example, you could add a contact tag that the lead unsubscribed, you could add a step to remove them from all workflows, etc.
You can use the Unsubscribe link in any campaign, bulk action, or one-off email or SMS communication.
Navigate to the email or SMS editor for the specific email or SMS you wish to update. (This can be within a Workflow, Trigger, or Campaign. It can also be a one-off or bulk-action email or SMS.)
Within the editor for the email or SMS, type out the text you want to insert the link in, such as “Click here to Unsubscribe.”
Highlight the text, click on the hyperlink icon, then, add the Unsubscribe funnel step URL.

You can also highlight the text, and then, use the Trigger Link icon to autopopulate the trigger link that connects to that URL.

Save your email/SMS template or send your email/SMS if it’s a one-off.
Now, if a user accidentally unsubscribes, they can easily opt back in by clicking the resubscribe link. This action will instantly remove their email from the Do Not Disturb (DND) list.
1. Go to Email Marketing:
Navigate to the Email Marketing section of your platform.
2. Create and Send a Campaign:
Create a new email campaign and send it to a dummy contact.
3. Click the Unsubscribe Link:
Open the email sent to the dummy contact and locate the unsubscribe link.
Click on the unsubscribe link to opt out from receiving further emails.
4. Use the Resubscribe Link:
After unsubscribing, check for the success message which may include a resubscribe link.
Click on the resubscribe link in the success message to re-enable receiving emails.
These steps ensure that you can manage subscriptions effectively using your platform's email marketing features.


Check the DND section in contacts.

Note:📋
Users re-opting in may still appear under unsubscribed in campaign statistics
