Access the Payments Section: Log in to Pest AI platform and navigate to the Payments section from the main dashboard.
Find Payment Links Feature: Once in the Payments section, locate the Payment Links feature.

Initiate Creation Process: Click on the Payment Links feature to begin creating a new payment link for your products or services.
Configure Payment Link Settings: Within the Payment Links interface, you'll have the option to configure various settings to tailor the payment link according to your specific requirements. This includes:
Security controls tightened for Authorize and NMI payments to enhance fraud prevention and improve user experience by requiring zip codes for payments.

Product Selection: Choose the product or service for which you want to create the payment link.
Pricing: Set the pricing for your product or service, including options for one-time purchases or recurring subscriptions.
Billing Frequency: Specify the billing frequency, such as monthly, weekly, or custom intervals, for recurring payments if applicable.
Additional Settings: Explore additional settings that may be available, such as statement descriptors, trial periods, or membership offers, depending on your business needs.

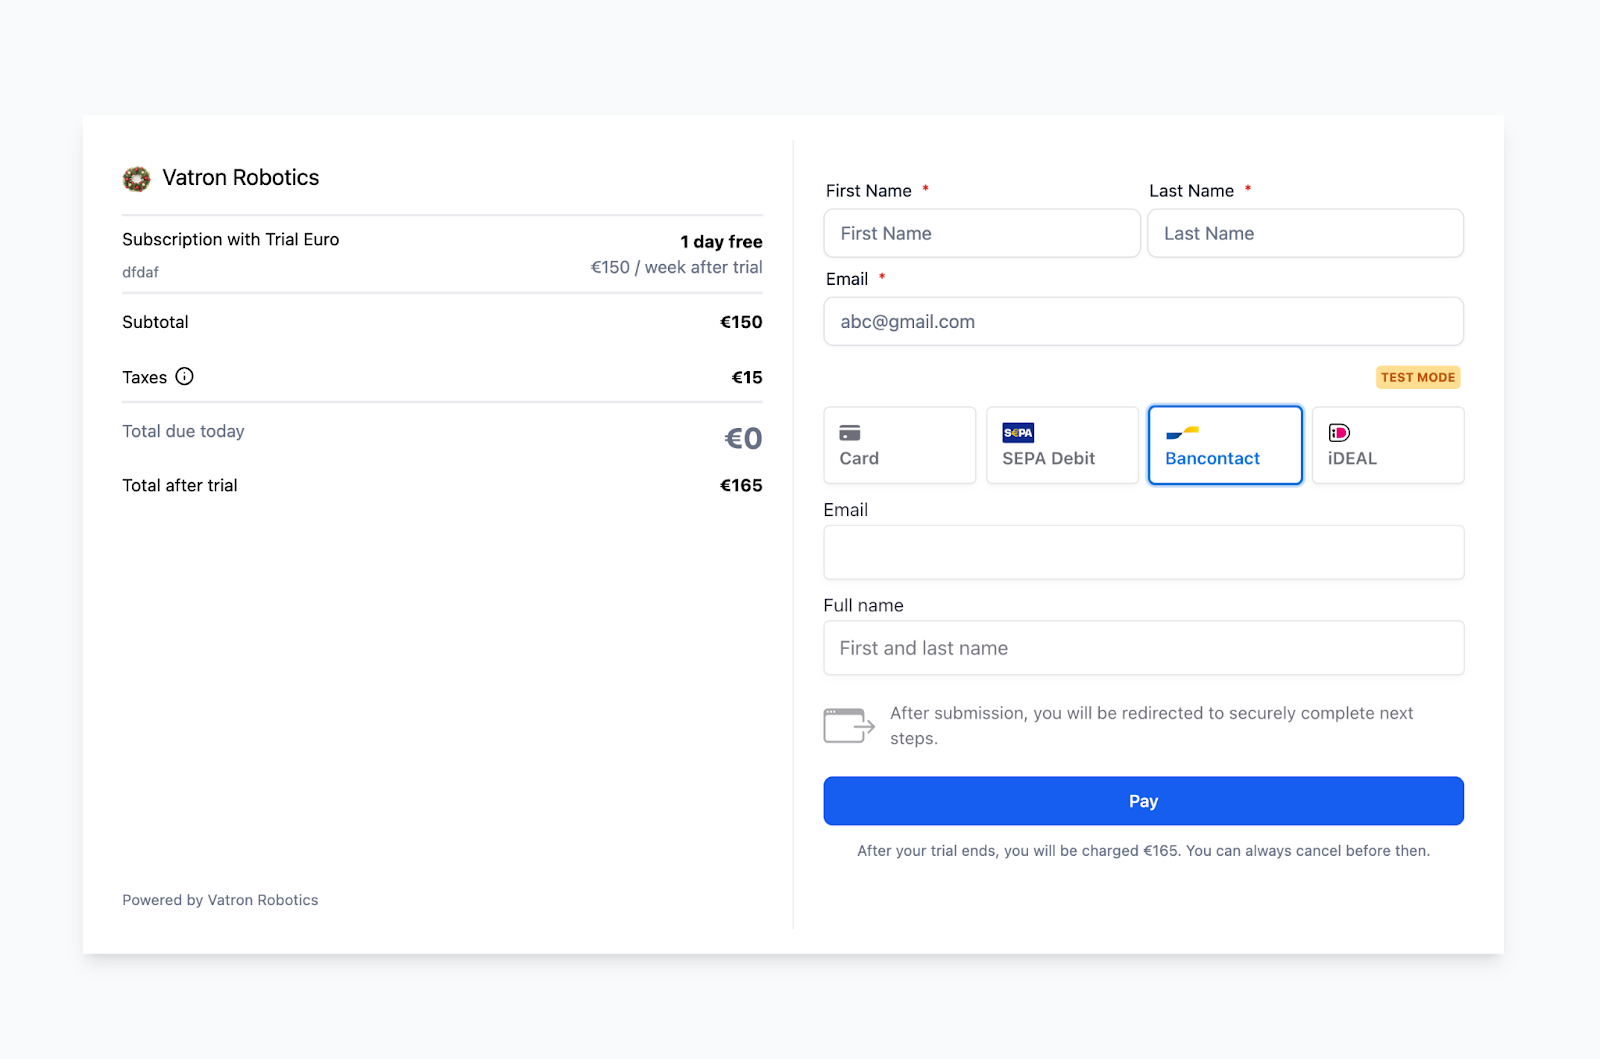
Note:Businesses using Stripe can now offer additional payment methods
IDeal - popular in Netherlands
Bancontact - common payment method in Belgium
Sepa Direct Debit - common payment method in European Union
State Dropdown for Payment Links:This enhances data accuracy and user experience.It is available in business details, company details and the create new contact modal.
Benefit: This enhancement will help streamline the collection of meaningful data, laying the groundwork for a wider variety of payment methods.
Navigate to the Payment Links section.
During the setup, use the dropdown menu to select the appropriate state in the relevant fields.
Save and proceed with your payment link creation.

Custom Terms and Conditions for Payment Links
You can also customize the terms and conditions displayed below the Pay button for Payment Links, allowing more control over the information presented to customers. This feature supports adding hyperlinks within the terms and conditions, directing users to detailed pages if needed. This update helps merchants communicate terms more effectively, potentially reducing chargebacks.
Navigate to the Payment Links section.
Check the box in the configuration panel on the left side to enable custom terms and conditions.


Click the hyperlink icon to add and customize the text and the redirection link.

Save your settings to ensure customers see the updated terms when they access the payment link.

Customize Payment Link: Customize the appearance and functionality of the payment link to align with your brand and preferences. This may include branding elements, button text, and other visual or textual customization options.
Preview Payment Link: Before finalizing, take advantage of the preview feature on the right side of the menu to review how the payment link will appear to customers.

How to Use Personalized Payment Links:
To use personalized payment links, navigate to the payment link section and create a new link. Select multiple contacts from the dropdown menu to generate personalized links, then configure email and SMS templates to include these links. You can use default templates or create custom ones, ensuring placeholders for contact-specific data are included.

Copy the standard or personalized links and send them via your preferred method. When recipients open the personalized links, their information will be pre-filled, making the payment process quicker and more efficient.

Save and Activate Payment Link: Once satisfied with the configuration, save the payment link and activate it to make it live and accessible to customers.
Share Payment Link: After activation, you can share the payment link directly with your customers via email, text message, social media, or any other preferred communication channel.

The introduction of coupon codes for payment links enhances the flexibility and promotional capabilities of the platform, allowing businesses to offer discounts and incentives to customers. With this feature, users can easily apply coupon codes to their payment links, providing a seamless experience for both businesses and customers.
Navigate to the payment link creation section within the platform.
While setting up the payment link, locate the option to include coupon codes.

Check the corresponding box to enable coupon code functionality.

Input the desired coupon code into the designated field.
Save the settings to apply the coupon code to the payment link.
Customers can then use the provided coupon code during checkout to avail of discounts or incentives associated with the payment link.
